
انتقل إلى المحتوى
منذ 2005 • سجل تجاري 392254
Home/BlogHosting service guidesHosting guides
Hosting service guides

How to compare international and local hosting companies

Compare support, cost, resources and server location rather than judging a provider by nationality.

HVIPS editorial teamReading: 3 minutes
How to compare international and local hosting companies
Image from the original article

Compare the actual service

Hosting and support quality cannot be generalised across all international or local providers. Review actual resources, usage limits, contract clarity and verifiable experience, and identify customer and provider responsibilities.

Support, language and response time

Check channels, operating hours, language and any service-level agreement. Distinguish initial response from resolution time and confirm emergency arrangements. A provider’s country does not establish its holiday or round-the-clock coverage.

Cost, location and migration

Compare introductory and renewal pricing, backups, restores, migration and taxes. Choose a server region suited to your audience and test latency. Confirm how to export and move your files and databases before subscribing.

References and tutorial links

What does this guide cover?

Compare support, cost, resources and server location rather than judging a provider by nationality.

Do screenshots and videos show the newest interface?

Original media are retained. Interfaces can vary by release; use the reviewed written steps and documentation links.

How can I ask for help with my situation?

Send the service name, release, error message and a description to support. Do not publish passwords or sensitive connection details.

HVIPS / FEEDBACK

Was this article helpful?

Your feedback helps us improve.

Choose your rating out of five

Be the first to rate

Preview: your rating is saved in this browser only.

Share this article

Home/BlogHosting service guidesHosting guides
Hosting service guides

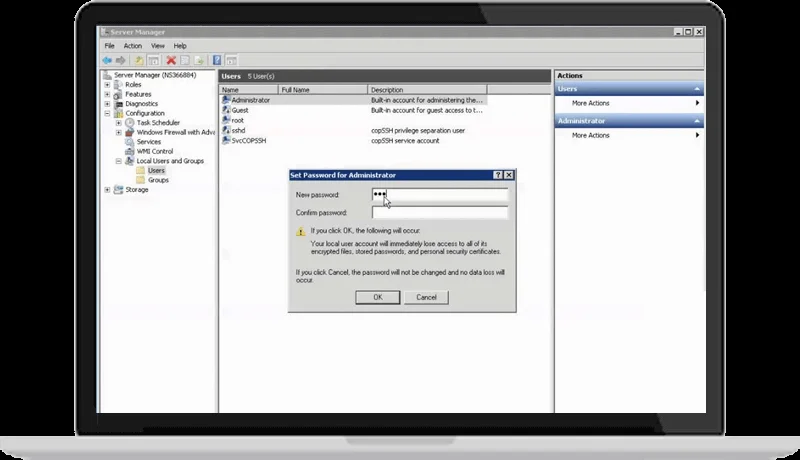
Change a Windows Server 2016 password

Change your account password inside a remote Windows session and check policy and dependent credentials.

HVIPS editorial teamReading: 3 minutes
Change a Windows Server 2016 password
Image from the original article

Identify the account

Confirm the server and the account being changed. Changing your own password differs from an administrator resetting another account. Domain accounts follow the organisation’s policy.

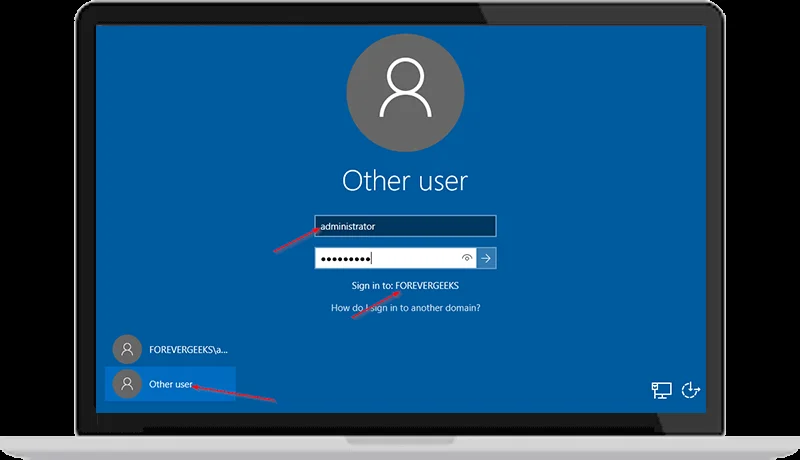
Change it inside the session

In a Windows Remote Desktop session, Ctrl+Alt+End can open the remote security screen and the password-change option when supported by the client. Enter the old and new passwords according to the account policy and store the result securely.

Check access and services

Update saved credentials and check services or scheduled tasks using that account. Changing a Windows password does not automatically update database or hosting-panel passwords. The original video documents the Windows Server 2016 interface.

Original tutorial video

The video shows the interface at recording time. Menu locations and buttons may differ in your release.

Open the original video ↗

Tutorial screenshots

These images belong to the original tutorial; follow the reviewed instructions above where interfaces differ.

Change a Windows Server 2016 password 1
Tutorial image 1

References and tutorial links

What does this guide cover?

Change your account password inside a remote Windows session and check policy and dependent credentials.

Do screenshots and videos show the newest interface?

Original media are retained. Interfaces can vary by release; use the reviewed written steps and documentation links.

How can I ask for help with my situation?

Send the service name, release, error message and a description to support. Do not publish passwords or sensitive connection details.
HVIPS / FEEDBACK

Was this article helpful?

Your feedback helps us improve.

Choose your rating out of five

Be the first to rate

Preview: your rating is saved in this browser only.

Share this article

Home/BlogHosting service guidesHosting guides
Hosting service guides

Broadcast live radio to your streaming server

Connect an audio-source application to the streaming server and verify source settings.

HVIPS editorial teamReading: 3 minutes
Broadcast live radio to your streaming server
Image from the original article

Review source connection details

Prepare the host, source port, source password or DJ account and any required mount point. Use your account’s values; source credentials can differ from the public listening URL and panel-administrator password.

Configure the broadcasting application

Select the input, codec and bitrate supported by the server and plan, then enter the source credentials. The original tutorial uses Winamp and SHOUTcast; current applications and screens may differ. Follow the server and application documentation.

Test live and AutoDJ handover

Live handover depends on the server configuration; some older SHOUTcast setups require stopping AutoDJ before the live source connects. Test the arrangement, monitor from another listening device and disconnect the live source properly afterward.

Original tutorial video

The video shows the interface at recording time. Menu locations and buttons may differ in your release.

Open the original video ↗

Tutorial screenshots

These images belong to the original tutorial; follow the reviewed instructions above where interfaces differ.

Broadcast live radio to your streaming server 1
Tutorial image 1

References and tutorial links

What does this guide cover?

Connect an audio-source application to the streaming server and verify source settings.

Do screenshots and videos show the newest interface?

Original media are retained. Interfaces can vary by release; use the reviewed written steps and documentation links.

How can I ask for help with my situation?

Send the service name, release, error message and a description to support. Do not publish passwords or sensitive connection details.

HVIPS / FEEDBACK

Was this article helpful?

Your feedback helps us improve.

Choose your rating out of five

Be the first to rate

Preview: your rating is saved in this browser only.

Share this article

Home/BlogHosting service guidesHosting guides
Hosting service guides

Start and manage a Centova Cast radio stream

Start a Centova Cast stream and review library, playlist and account settings.

HVIPS editorial teamReading: 3 minutes
Start and manage a Centova Cast radio stream
Image from the original article

Open your account and identify the setup

Sign in to Centova Cast and identify the server type, AutoDJ availability and plan limits. Review station and listener details. Keep administrator and source passwords separate and do not publish them on the website.

Start the server and prepare content

Use Start in the server controls. If AutoDJ is available, upload authorised audio and organise the library and playlists. Without AutoDJ, a live source must supply the audio feed.

Monitor playback and troubleshoot

Test listening outside the panel and check source status and logs if audio stops. Compare ports and credentials with the account settings rather than changing them randomly. The original images and video show an older interface whose buttons may differ.

Original tutorial video

The video shows the interface at recording time. Menu locations and buttons may differ in your release.

Open the original video ↗

Tutorial screenshots

These images belong to the original tutorial; follow the reviewed instructions above where interfaces differ.

Start and manage a Centova Cast radio stream 1
Tutorial image 1

References and tutorial links

What does this guide cover?

Start a Centova Cast stream and review library, playlist and account settings.

Do screenshots and videos show the newest interface?

Original media are retained. Interfaces can vary by release; use the reviewed written steps and documentation links.

How can I ask for help with my situation?

Send the service name, release, error message and a description to support. Do not publish passwords or sensitive connection details.

HVIPS / FEEDBACK

Was this article helpful?

Your feedback helps us improve.

Choose your rating out of five

Be the first to rate

Preview: your rating is saved in this browser only.

Share this article

Home/BlogHosting service guidesHosting guides
Hosting service guides

Connect to a Windows server with Remote Desktop

Connect to your own Windows server using the correct address, account and access settings.

HVIPS editorial teamReading: 3 minutes
Connect to a Windows server with Remote Desktop
Image from the original article

Prepare the connection details

Obtain the server address, username, access method and any custom port from your provider. Confirm Remote Desktop permissions and a trusted access path. Do not disable the firewall or NLA as a routine connection fix.

Open Remote Desktop Connection

On Windows, open Remote Desktop Connection or run mstsc. Enter the server address and account details. Review the server identity and any certificate warning before proceeding, especially if the address or warning has changed.

If the connection fails

Check the address, port, network and account permissions first. Ask the provider to review access settings and logs if necessary. The original video uses Windows Server 2016, so labels and screens may differ on other releases.

Original tutorial video

The video shows the interface at recording time. Menu locations and buttons may differ in your release.

Open the original video ↗

Tutorial screenshots

These images belong to the original tutorial; follow the reviewed instructions above where interfaces differ.

Connect to a Windows server with Remote Desktop 1
Tutorial image 1

References and tutorial links

What does this guide cover?

Connect to your own Windows server using the correct address, account and access settings.

Do screenshots and videos show the newest interface?

Original media are retained. Interfaces can vary by release; use the reviewed written steps and documentation links.

How can I ask for help with my situation?

Send the service name, release, error message and a description to support. Do not publish passwords or sensitive connection details.

HVIPS / FEEDBACK

Was this article helpful?

Your feedback helps us improve.

Choose your rating out of five

Be the first to rate

Preview: your rating is saved in this browser only.

Share this article

Home/BlogHosting service guidesHosting guides
Hosting service guides

Create an online radio station

Prepare stream hosting, an audio source, a listening URL and a website player.

HVIPS editorial teamReading: 3 minutes
Create an online radio station
Image from the original article

Prepare hosting and the audio source

Prepare stream hosting with suitable listener and bitrate limits, plus a live source or AutoDJ if supported. Use audio you are entitled to broadcast, and define the schedule and account permissions.

Start and test the stream

Start the streaming server and connect the live source or prepare the AutoDJ library and playlists. Test listening from another device before adding the website player. A running server still needs an audio source.

Add the website player

Use the correct stream URL and a format supported by the player. Test HTTPS, mobile playback, pause and volume. Do not rely on audible autoplay, which browsers may restrict. The original video is retained below.

Original tutorial video

The video shows the interface at recording time. Menu locations and buttons may differ in your release.

Open the original video ↗

Tutorial screenshots

These images belong to the original tutorial; follow the reviewed instructions above where interfaces differ.

Create an online radio station 1
Tutorial image 1

References and tutorial links

What does this guide cover?

Prepare stream hosting, an audio source, a listening URL and a website player.

Do screenshots and videos show the newest interface?

Original media are retained. Interfaces can vary by release; use the reviewed written steps and documentation links.

How can I ask for help with my situation?

Send the service name, release, error message and a description to support. Do not publish passwords or sensitive connection details.
HVIPS / FEEDBACK

Was this article helpful?

Your feedback helps us improve.

Choose your rating out of five

Be the first to rate

Preview: your rating is saved in this browser only.

Share this article

Home/BlogHosting service guidesHosting guides
Hosting service guides

WordPress image compression plugins

Compare image optimisation tools while checking quality, originals and current plan limits.

HVIPS editorial teamReading: 3 minutes
WordPress image compression plugins
Image from the original article

Resize before compressing

Retain originals and choose dimensions suited to the display area. Compression alone does not replace resizing. Test photos, logos and Arabic text, and compare visual quality and file size before processing the entire library.

The five plugins covered

The article covers reSmush.it, EWWW Image Optimizer, TinyPNG Image Optimization, ShortPixel Image Optimizer and Smush. Processing methods, external services and free versus paid features differ. Check each current listing rather than relying on historical quotas or prices.

Test delivery and performance

Avoid overlapping image-processing tools unless responsibilities are clear. Check WebP or AVIF delivery and fallbacks. Test actual pages after clearing caches, including thumbnails and the lead image. Smaller images alone do not guarantee search rankings.

Tutorial screenshots

These images belong to the original tutorial; follow the reviewed instructions above where interfaces differ.

WordPress image compression plugins 1
Tutorial image 1
WordPress image compression plugins 2
Tutorial image 2
WordPress image compression plugins 3
Tutorial image 3
WordPress image compression plugins 4
Tutorial image 4
WordPress image compression plugins 5
Tutorial image 5
WordPress image compression plugins 6
Tutorial image 6
WordPress image compression plugins 7
Tutorial image 7

References and tutorial links

What does this guide cover?

Compare image optimisation tools while checking quality, originals and current plan limits.

Do screenshots and videos show the newest interface?

Original media are retained. Interfaces can vary by release; use the reviewed written steps and documentation links.

How can I ask for help with my situation?

Send the service name, release, error message and a description to support. Do not publish passwords or sensitive connection details.

HVIPS / FEEDBACK

Was this article helpful?

Your feedback helps us improve.

Choose your rating out of five

Be the first to rate

Preview: your rating is saved in this browser only.

Share this article

Home/BlogHosting service guidesHosting guides
Hosting service guides

Free and paid SSL certificates: what changes?

Separate encryption, identity validation, support and renewal when comparing free and paid certificates.

HVIPS editorial teamReading: 3 minutes
Free and paid SSL certificates: what changes?
Image from the original article

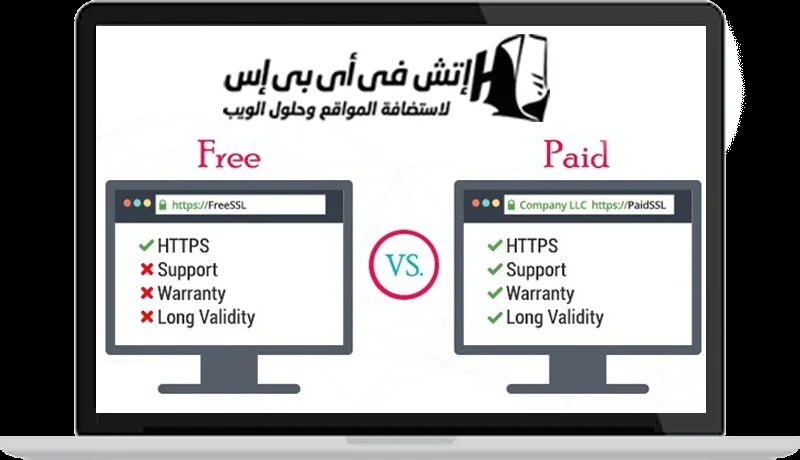
Price does not determine encryption

Trusted free certificates can secure HTTPS connections. Payment alone does not establish stronger encryption; server configuration, protocols and renewal matter. A TLS certificate does not fix website vulnerabilities or malicious content.

Domain and organisation validation

Let’s Encrypt issues DV certificates to validate control of a domain. Commercial issuers may offer OV or EV products with additional organisation checks. Validation type differs from encryption, and visitor recognition or higher sales should not be assumed.

Compatibility, renewal and support

Check target-device compatibility, the certificate chain, renewal automation and failure alerts. Validity and issuance policies change, so use the issuer’s current information. Support and contractual warranties vary and are not general website-breach insurance.

How to choose

Choose according to validation, support, integration and administration needs. Confirm current checkout costs instead of relying on historical article prices. After installation, test HTTPS, redirects, mixed content and renewal monitoring.

References and tutorial links

What does this guide cover?

Separate encryption, identity validation, support and renewal when comparing free and paid certificates.

Do screenshots and videos show the newest interface?

Original media are retained. Interfaces can vary by release; use the reviewed written steps and documentation links.

How can I ask for help with my situation?

Send the service name, release, error message and a description to support. Do not publish passwords or sensitive connection details.

HVIPS / FEEDBACK

Was this article helpful?

Your feedback helps us improve.

Choose your rating out of five

Be the first to rate

Preview: your rating is saved in this browser only.

Share this article

Home/BlogHosting service guidesHosting guides
Hosting service guides

How to choose affordable website hosting

Evaluate affordable hosting by website needs, total cost, renewals and backups.

HVIPS editorial teamReading: 3 minutes
How to choose affordable website hosting
Image from the original article

Fit the website and budget

Affordable hosting may suit a small website with clear requirements, but price alone does not establish quality. Define the website, traffic, storage, plugins and support needs. Avoid taking on server administration you do not need or cannot manage.

Compare total and renewal costs

Check the commitment period, renewal price, add-ons, taxes and any restore or transfer charges. Historical thresholds such as three dollars are not permanent market definitions. Compare actual offers with equivalent terms and resources.

Check limits and upgrade options

Review CPU, memory, process and database limits, backups and what happens when limits are reached. Check support, contract clarity, upgrades and migration. Choose using measurable needs rather than cheap or unlimited labels.

Tutorial screenshots

These images belong to the original tutorial; follow the reviewed instructions above where interfaces differ.

How to choose affordable website hosting 1
Tutorial image 1

References and tutorial links

What does this guide cover?

Evaluate affordable hosting by website needs, total cost, renewals and backups.

Do screenshots and videos show the newest interface?

Original media are retained. Interfaces can vary by release; use the reviewed written steps and documentation links.

How can I ask for help with my situation?

Send the service name, release, error message and a description to support. Do not publish passwords or sensitive connection details.

HVIPS / FEEDBACK

Was this article helpful?

Your feedback helps us improve.

Choose your rating out of five

Be the first to rate

Preview: your rating is saved in this browser only.

Share this article

Home/BlogHosting service guidesHosting guides
Hosting service guides

10 Arabic WordPress themes: the 2023 collection

The original 2023 theme collection, with practical checks for language, compatibility and performance.

HVIPS editorial teamReading: 3 minutes
10 Arabic WordPress themes: the 2023 collection
Image from the original article

About the 2023 collection

This is the collection published in 2023, rather than a current-year ranking. The original theme names and page links remain available. Confirm the available release, licence and support before ordering.

Test Arabic with real content

Test menus, forms, long text, Arabic fonts, numbers and RTL direction on desktop and mobile. Try your real content; a promotional screenshot does not establish whether a theme fits your project.

Performance, updates and licensing

Compare performance using realistic content, and check updates, plugin compatibility and PHP requirements. Confirm the site allowance, support period and bundled-plugin licences. A paid theme alone does not guarantee security or speed.

Tutorial screenshots

These images belong to the original tutorial; follow the reviewed instructions above where interfaces differ.

10 Arabic WordPress themes: the 2023 collection 1
Tutorial image 1
10 Arabic WordPress themes: the 2023 collection 2
Tutorial image 2
10 Arabic WordPress themes: the 2023 collection 3
Tutorial image 3
10 Arabic WordPress themes: the 2023 collection 4
Tutorial image 4
10 Arabic WordPress themes: the 2023 collection 5
Tutorial image 5
10 Arabic WordPress themes: the 2023 collection 6
Tutorial image 6
10 Arabic WordPress themes: the 2023 collection 7
Tutorial image 7
10 Arabic WordPress themes: the 2023 collection 8
Tutorial image 8
10 Arabic WordPress themes: the 2023 collection 9
Tutorial image 9

References and tutorial links

What does this guide cover?

The original 2023 theme collection, with practical checks for language, compatibility and performance.

Do screenshots and videos show the newest interface?

Original media are retained. Interfaces can vary by release; use the reviewed written steps and documentation links.

How can I ask for help with my situation?

Send the service name, release, error message and a description to support. Do not publish passwords or sensitive connection details.

HVIPS / FEEDBACK

Was this article helpful?

Your feedback helps us improve.

Choose your rating out of five

Be the first to rate

Preview: your rating is saved in this browser only.

Share this article